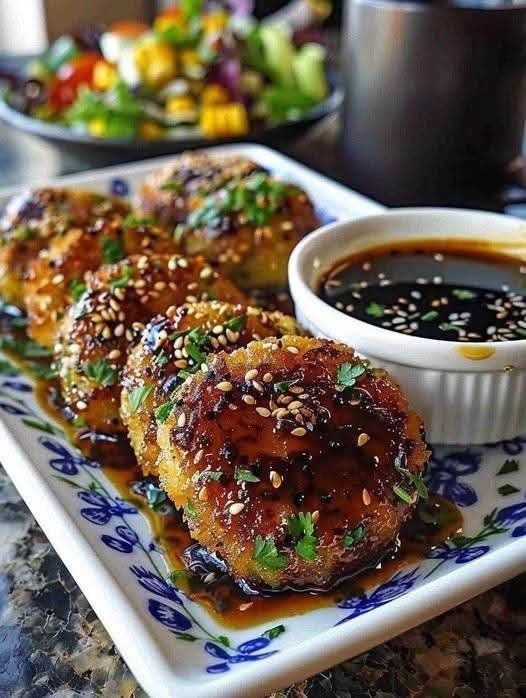
These Vegan Sticky Miso Glazed Chickpea Cutlets are crispy on the outside, tender on the inside, and coated in a delicious sweet-and-savory miso glaze! Made with mashed chickpeas, breadcrumbs, garlic, fresh herbs, and simple pantry ingredients, these plant-based cutlets are satisfying, flavorful, and surprisingly easy to prepare.
The best part is the sticky miso glaze, made with white miso, maple syrup, soy sauce, ginger, and garlic. It gives every bite a rich umami flavor with just the right balance of sweetness and tanginess.
Serve them with steamed rice, roasted vegetables, or a fresh cucumber salad for a delicious vegan dinner!
Recipe Overview
- Prep Time: 15 minutes
- Chilling Time: 15 minutes
- Cook Time: 20 minutes
- Total Time: 50 minutes
- Servings: 4 (8 cutlets)
- Course: Main Course
- Cuisine: Asian-inspired
- Diet: Vegan, Dairy-Free
Ingredients
For the Chickpea Cutlets
- 2 cans (15 oz each) chickpeas, drained and rinsed
- ½ cup breadcrumbs
- ¼ cup finely chopped red onion
- 2 garlic cloves, minced
- 2 tablespoons chopped fresh parsley
- 2 tablespoons nutritional yeast
- 1 tablespoon soy sauce or tamari
- 1 tablespoon lemon juice
- 1 teaspoon smoked paprika
- ½ teaspoon ground cumin
- ½ teaspoon black pepper
- ¼ teaspoon salt, or to taste
- 2 tablespoons olive oil, for cooking
For the Sticky Miso Glaze
- 2 tablespoons white miso paste
- 2 tablespoons maple syrup
- 1 tablespoon soy sauce or tamari
- 1 tablespoon rice vinegar
- 2 garlic cloves, minced
- 1 teaspoon freshly grated ginger
- 1 teaspoon sesame oil
- ¼ cup water
- 1 teaspoon cornstarch mixed with 1 tablespoon cold water
For Garnishing
- 1 tablespoon sesame seeds
- 2 green onions, thinly sliced
- Fresh cilantro (optional)
- Red pepper flakes (optional)
How to Make Vegetarian Chickpea Patties: A Simple Guide
Instructions
Step 1: Prepare the Chickpeas
Drain and rinse the chickpeas thoroughly. Pat them dry with a clean kitchen towel.
Place the chickpeas in a large mixing bowl and mash them with a fork or potato masher until mostly broken down.
Leave a few small chickpea pieces for texture. Avoid turning them into a completely smooth puree.
Smashed Chickpea Spread — The Renata Collective
Step 2: Make the Cutlet Mixture
Add the breadcrumbs, chopped red onion, minced garlic, parsley, nutritional yeast, soy sauce, lemon juice, smoked paprika, cumin, black pepper, and salt.
Mix everything until well combined.
The mixture should hold together when pressed. If it feels too wet, add another tablespoon of breadcrumbs.
Crispy Chickpea Quinoa Patties | Easy Vegan Burger Recipe
Step 3: Shape the Cutlets
Divide the mixture into 8 equal portions.
Shape each portion into a small oval or round cutlet, about ½ inch thick. Press the edges gently to prevent cracking.
Place the cutlets on a plate and refrigerate for 15 minutes. This helps them firm up and makes cooking easier.
Najlepšie zeleninové karbonátky – z 2 plechoviek cíceru nakŕmite celú rodinu – Varíme s Láskou
Step 4: Cook Until Golden
Heat olive oil in a large nonstick skillet over medium heat.
Place the chickpea cutlets in the skillet without overcrowding. Cook for approximately 4–5 minutes on each side until golden brown and firm.
Work in batches if necessary, adding a little more oil between batches.
Transfer the cooked cutlets to a plate.
Simple Vegan Chickpea Patties – Light Orange Bean
Step 5: Prepare the Sticky Miso Glaze
In a small bowl, whisk together the white miso paste, maple syrup, soy sauce, rice vinegar, garlic, ginger, sesame oil, and water.
Mix until smooth.
In a separate small bowl, stir the cornstarch with 1 tablespoon cold water to make a slurry.
Roasted Miso Maple Salmon Recipe
Step 6: Cook the Glaze
Pour the miso mixture into a small saucepan over medium-low heat.
Bring it to a gentle simmer, stirring frequently. Add the cornstarch slurry and continue stirring for 1–2 minutes until the glaze becomes glossy and thick.
Remove from the heat. The glaze should be sticky enough to coat the back of a spoon.
Miso And Maple-Glazed Ham Recipe
Step 7: Glaze the Chickpea Cutlets
Return the cooked cutlets to the skillet over low heat.
Pour the sticky miso glaze over them and gently turn each cutlet to coat both sides.
Cook for another 1–2 minutes, spooning the glaze over the cutlets until they look shiny and beautifully coated.
Spicy burgeri od slanutka + veganski umak
Step 8: Garnish and Serve
Transfer the glazed chickpea cutlets to a serving plate.
Sprinkle with sesame seeds, sliced green onions, and fresh cilantro. Add a pinch of red pepper flakes if you enjoy a little heat.
Serve warm with steamed rice, roasted broccoli, or your favorite vegetables.
Riso con broccoli e polpette di ceci – Cucina Naturale
Tips for the Best Chickpea Cutlets
- Dry the chickpeas: Excess moisture can make the mixture too soft.
- Keep some texture: Don’t mash the chickpeas into a completely smooth paste.
- Chill before cooking: Refrigerating the shaped cutlets helps them hold together.
- Use medium heat: This allows the outside to become golden without burning.
- Choose white miso: It gives the glaze a mild, slightly sweet umami flavor.
- Glaze at the end: Adding the sauce after cooking helps prevent the maple syrup from burning.
- Adjust the consistency: Add a little water if the glaze becomes too thick.
Easy Recipe Variations
Spicy Miso Chickpea Cutlets: Add 1 teaspoon sriracha or extra red pepper flakes to the glaze.
Extra Crispy Cutlets: Coat the shaped patties lightly with additional breadcrumbs before frying.
Baked Chickpea Cutlets: Brush both sides with olive oil and bake at 400°F (200°C) for 20–25 minutes, flipping halfway through.
Gluten-Free Version: Use gluten-free breadcrumbs, tamari, and certified gluten-free miso paste.
Lemon Herb Chickpea Cutlets: Add fresh lemon zest, extra parsley, and a little dried oregano to the mixture.
Air Fryer Version: Spray the cutlets lightly with oil and air-fry at 375°F (190°C) for approximately 12–16 minutes, flipping halfway through.
What to Serve with Miso Glazed Chickpea Cutlets
- Steamed jasmine rice
- Garlic sesame noodles
- Roasted broccoli
- Asian cucumber salad
- Stir-fried green beans
- Carrot and cabbage slaw
- Quinoa and edamame bowls
Storage and Reheating
- Refrigerator: Store cooked cutlets in an airtight container for up to 3–4 days.
- Freezer: Freeze cooked, cooled cutlets for up to 2 months. For best results, freeze the glaze separately.
- Reheating: Warm in a skillet over medium-low heat or in an oven at 350°F (175°C) until heated through.
- Microwave: Heat in short intervals until steaming hot, although the cutlets will be softer.
- Make ahead: Prepare and shape the chickpea mixture up to 24 hours in advance. Cover and refrigerate until ready to cook.
Frequently Asked Questions
1. Can I use dried chickpeas instead of canned chickpeas?
Yes! Cook dried chickpeas until completely tender, drain them well, and measure out approximately 3 cups of cooked chickpeas for this recipe.
2. Why are my chickpea cutlets falling apart?
The mixture may contain too much moisture or not enough breadcrumbs. Dry the chickpeas well, mash them with some texture, and chill the shaped cutlets before cooking.
3. What does white miso taste like?
White miso has a mild, savory, slightly sweet flavor. It adds a delicious umami taste to the glaze.
4. Can I make these cutlets without nutritional yeast?
Absolutely! You can leave it out. The cutlets will still taste delicious, although they’ll have a slightly different savory flavor.
5. Are these chickpea cutlets completely vegan?
Yes! This recipe contains no meat, eggs, dairy, or honey. Just make sure your breadcrumbs, miso paste, and other packaged ingredients are vegan.
Printable Recipe Card
Easy Chickpea Patties – Crispy, Vegan, Panfried or Baked!
Vegan Sticky Miso Glazed Chickpea Cutlets
Golden chickpea patties coated in a sweet, savory, and sticky homemade miso garlic glaze.
Prep Time
15 minutes
Chilling Time
15 minutes
Cook Time
20 minutes
Total Time
50 minutes
Servings
4 (8 cutlets)
Diet
Vegan
Ingredients
Chickpea Cutlets
- 2 cans (15 oz each) chickpeas, drained and rinsed
- ½ cup breadcrumbs
- ¼ cup chopped red onion
- 2 garlic cloves, minced
- 2 tablespoons fresh parsley
- 2 tablespoons nutritional yeast
- 1 tablespoon soy sauce
- 1 tablespoon lemon juice
- 1 teaspoon smoked paprika
- ½ teaspoon ground cumin
- ½ teaspoon black pepper
- ¼ teaspoon salt
- 2 tablespoons olive oil
Sticky Miso Glaze
- 2 tablespoons white miso paste
- 2 tablespoons maple syrup
- 1 tablespoon soy sauce
- 1 tablespoon rice vinegar
- 2 garlic cloves, minced
- 1 teaspoon grated ginger
- 1 teaspoon sesame oil
- ¼ cup water
- 1 teaspoon cornstarch mixed with 1 tablespoon cold water
Garnish
- Sesame seeds
- 2 sliced green onions
- Fresh cilantro (optional)
Instructions
- Drain, rinse, and dry chickpeas. Mash them in a large bowl, leaving some texture.
- Mix in breadcrumbs, onion, garlic, parsley, nutritional yeast, soy sauce, lemon juice, and seasonings.
- Shape into 8 cutlets and refrigerate for 15 minutes.
- Heat olive oil in a skillet. Cook cutlets for 4–5 minutes per side until golden.
- Whisk miso, maple syrup, soy sauce, rice vinegar, garlic, ginger, sesame oil, and water.
- Simmer sauce over medium-low heat. Stir in cornstarch slurry and cook until glossy and thick.
- Coat cooked cutlets in the glaze over low heat for 1–2 minutes.
- Garnish with sesame seeds and green onions. Serve warm.
Notes: Dry chickpeas well before mashing. Use gluten-free breadcrumbs and tamari for a gluten-free version. Store cooked cutlets in the refrigerator for 3–4 days.