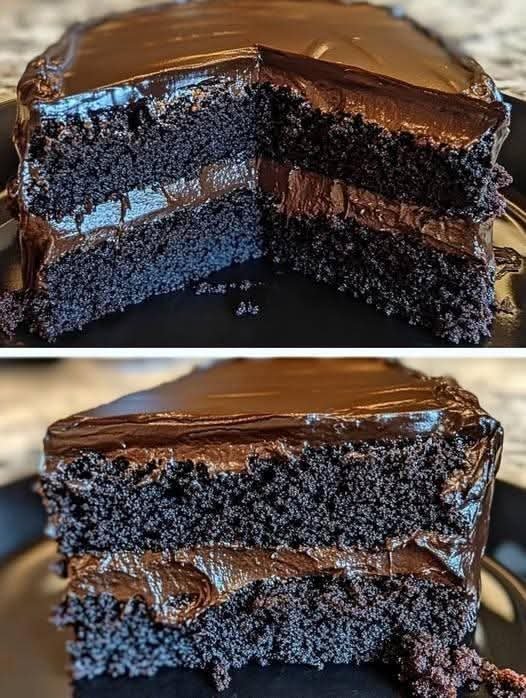
A rich, moist, and ultra-chocolatey Vegan Blackout Cake made completely without eggs or dairy! This decadent dessert features three layers of soft chocolate cake, creamy chocolate pudding filling, and silky chocolate frosting. Finished with chocolate cake crumbs, it’s the perfect showstopper for birthdays, holidays, and chocolate cravings.
Recipe Details
Prep time
35 minutes
Bake time
30–35 minutes
Servings
10–12
Ingredients
For the Vegan Chocolate Cake
- 2 cups (250 g) all-purpose flour
- ¾ cup (75 g) unsweetened cocoa powder
- 1½ cups (300 g) granulated sugar
- 2 teaspoons baking powder
- 1½ teaspoons baking soda
- ½ teaspoon salt
- 1 cup (240 ml) unsweetened almond milk or soy milk
- ½ cup (120 ml) vegetable oil
- 2 teaspoons vanilla extract
- 1 tablespoon apple cider vinegar
- 1 cup (240 ml) hot coffee or hot water
For the Chocolate Pudding Filling
- 2 cups (480 ml) unsweetened plant milk
- ½ cup (100 g) granulated sugar
- ¼ cup (25 g) unsweetened cocoa powder
- 3 tablespoons cornstarch
- ½ cup (85 g) dairy-free dark chocolate, chopped
- 1 teaspoon vanilla extract
- Pinch of salt
For the Vegan Chocolate Frosting
- 1 cup (225 g) dairy-free baking butter, softened
- ½ cup (45–50 g) unsweetened cocoa powder
- 2½ cups (300 g) powdered sugar
- 3–4 tablespoons plant milk
- 1 teaspoon vanilla extract
- Pinch of salt
For the Chocolate Crumb Coating
- 1 cup chocolate cake crumbs reserved from the baked cake
- Optional: dairy-free chocolate shavings for decoration
Instructions
Step 1: Prepare the oven and pans

Preheat your oven to 350°F (175°C). Grease three 8-inch round cake pans and line the bottoms with parchment paper.
If you have only two pans, bake the cake in batches or use two pans and slice the cooled cakes horizontally to make three layers.
Step 2: Mix the dry ingredients

In a large mixing bowl, whisk together the flour, cocoa powder, sugar, baking powder, baking soda, and salt until evenly combined.
Break up any lumps in the cocoa powder for a smoother cake batter.
Step 3: Add the wet ingredients

Add the plant milk, vegetable oil, vanilla extract, and apple cider vinegar. Mix until the batter is smooth.
Slowly pour in the hot coffee or hot water and stir gently. The batter will be thin; this is normal and helps create a moist chocolate cake.
Step 4: Bake the cake layers

Divide the batter evenly among the prepared pans.
Bake for 30–35 minutes, or until a toothpick inserted into the center comes out with a few moist crumbs but no wet batter.
Let the cakes cool in their pans for 10–15 minutes, then turn them out onto wire racks and allow them to cool completely.
Important: Do not assemble the cake while the layers are warm, or the filling and frosting may melt.
Step 5: Make the chocolate pudding filling

In a saucepan, whisk together the plant milk, sugar, cocoa powder, cornstarch, and salt until smooth.
Place over medium heat and cook, whisking continuously, for 5–8 minutes until the mixture thickens into a pudding.
Remove from the heat and stir in the chopped dairy-free chocolate and vanilla extract until smooth.
Transfer to a bowl, cover the surface directly with plastic wrap to prevent a skin from forming, and refrigerate until completely cold and thick.
Step 6: Prepare the vegan chocolate frosting

Beat the dairy-free butter with an electric mixer until light and creamy.
Add the cocoa powder and powdered sugar gradually, mixing on low speed at first. Add the vanilla extract, salt, and plant milk one tablespoon at a time.
Beat for another 2–3 minutes until smooth, fluffy, and spreadable.
If the frosting is too thick, add a little more plant milk. If it’s too soft, refrigerate briefly.
Step 7: Assemble the cake layers

Place the first completely cooled cake layer on a serving plate or cake stand.
Spread half of the chilled chocolate pudding over the top, leaving a small border around the edge. Add the second cake layer and spread the remaining pudding evenly.
Place the third cake layer on top.
Press gently to level the layers, then refrigerate for 15–20 minutes to help the filling set before frosting.
Step 8: Frost the entire cake

Spread the chocolate frosting over the top and sides of the cake using an offset spatula.
Don’t worry about achieving perfectly smooth sides. A slightly rustic finish works beautifully with the chocolate crumb coating.
Step 9: Add the chocolate crumbs

Take a small amount of cake from the trimmed tops or edges and crumble it finely. If the cakes have no excess, bake a little extra batter in a small oven-safe dish or use finely crushed vegan chocolate cookies.
Gently press the crumbs onto the sides and top of the frosted cake.
Add optional dairy-free chocolate shavings for an extra-special finish.
Step 10: Chill, slice, and serve

Refrigerate the finished cake for at least 30–60 minutes to help the filling set.
For clean slices, use a sharp knife dipped in warm water and wiped dry between cuts.
Serve slightly chilled or let each slice sit at room temperature for about 10–15 minutes before enjoying.
Tips for the Best Vegan Blackout Cake
- Use coffee for deeper flavor: Coffee intensifies the chocolate taste without making the cake taste strongly of coffee.
- Cool everything completely: Warm cake layers can cause the pudding and frosting to slide.
- Use dairy-free chocolate: Check the label to make sure your chocolate contains no milk ingredients.
- Make the pudding thick enough: It should hold its shape when cooled, rather than run out between the layers.
- Prepare ahead: Bake the cake layers a day in advance and wrap them tightly once cool.
Storage Instructions
- Refrigerator: Store in an airtight container for up to 4 days.
- Freezer: Freeze individual slices, well wrapped, for up to 2 months for best quality.
- Serving: Because the cake contains a plant-milk pudding filling, keep it refrigerated and avoid leaving it at room temperature for more than 2 hours.
Frequently Asked Questions
Can I make this cake without coffee?
Yes! Replace the coffee with hot water. The cake will still be delicious and chocolatey.
Can I use oat milk instead of almond milk?
Absolutely. Unsweetened oat milk or soy milk works well in both the cake and pudding.
Why is it called blackout cake?
Blackout cake is known for its dark chocolate cake, rich chocolate pudding filling, chocolate frosting, and chocolate crumb coating. This vegan version recreates that indulgent style without eggs or dairy.
Can I make this cake a day ahead?
Yes. Prepare and assemble it the day before, refrigerate it in a covered container, and slice it when ready to serve.
Printable Recipe Card
Vegan Blackout Cake
Moist chocolate cake with creamy vegan chocolate pudding, chocolate frosting, and chocolate crumbs.
PREP
35 min
BAKE
30–35 min
YIELD
10–12 slices
Quick Instructions
- Whisk dry cake ingredients together.
- Add plant milk, oil, vanilla, vinegar, and hot coffee.
- Divide into three 8-inch pans and bake at 350°F (175°C) for 30–35 minutes.
- Cook the pudding filling until thick, then chill completely.
- Whip the vegan buttercream frosting.
- Layer the cooled cakes with pudding, frost the cake, and coat with chocolate crumbs.
- Chill for 30–60 minutes before slicing.