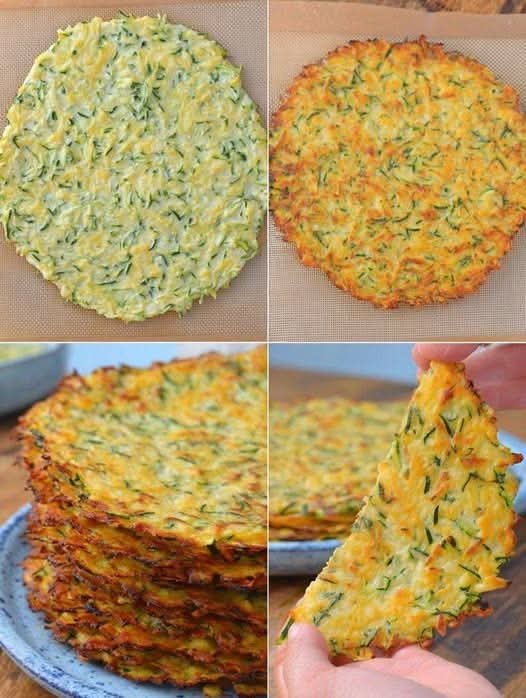
These Homemade Zucchini Tortillas are a delicious, veggie-packed alternative to traditional tortillas! They’re soft, flexible, lightly golden, and perfect for tacos, quesadillas, breakfast wraps, or a quick snack. Made with fresh zucchini and a handful of everyday ingredients, they’re a simple way to add more vegetables to your meals.
Whether you’re looking for a creative way to use up garden zucchini or want something different for taco night, these homemade tortillas are easy to prepare and full of flavor.
Recipe at a glance
Prep time
15 minutes
Cook time
15 minutes
Total time
30 minutes
Yield
6 small tortillas
Difficulty
Easy
Diet
Vegetarian, gluten-free if using suitable flour
Ingredients

- 2 medium zucchini (about 2 cups grated)
- 2 large eggs
- ½ cup shredded mozzarella cheese
- ¼ cup almond flour
- ½ teaspoon garlic powder
- ½ teaspoon salt, or to taste
- ¼ teaspoon black pepper
- 1 tablespoon olive oil, for lightly greasing the pan
Optional additions: A pinch of paprika, dried oregano, or Italian seasoning for extra flavor.
Step-by-step instructions
Step 1: Grate and drain the zucchini

Wash the zucchini and grate it using the large holes of a box grater. Place the grated zucchini in a clean kitchen towel and squeeze firmly to remove as much excess water as possible. This is the most important step for tortillas that hold together.
Step 2: Prepare the tortilla mixture

Add the drained zucchini to a mixing bowl. Mix in the eggs, shredded mozzarella, almond flour, garlic powder, salt, and black pepper. Stir until everything is evenly combined. The mixture should be moist but thick enough to spread into thin rounds.
Step 3: Shape the tortillas

Preheat your oven to 400°F (200°C). Line a large baking sheet with parchment paper. Divide the mixture into six portions and spread each portion into a thin circle, about 5–6 inches wide. Keep the thickness even so the tortillas cook uniformly.
Step 4: Bake until golden

Bake for 15–20 minutes, or until the tortillas are set and the edges are lightly golden. Cooking time may vary depending on their thickness and how much moisture remains in the zucchini.
Step 5: Cool and serve

Let the tortillas rest on the baking sheet for 3–5 minutes, then carefully lift them from the parchment. For a slightly crispier finish, warm them in a lightly oiled skillet for 1–2 minutes per side. Serve warm with your favorite fillings.
Tips for the best zucchini tortillas
- Remove excess moisture: Squeeze the grated zucchini thoroughly to help the tortillas hold their shape.
- Spread them thinly: Thin, even rounds cook more consistently and are easier to use as wraps.
- Use parchment paper: This helps prevent sticking and makes the tortillas easier to lift.
- Let them rest: Give the tortillas a few minutes to firm up before removing them from the tray.
- Make them your own: Add fresh herbs, chili flakes, smoked paprika, or your favorite seasoning blend.
How to serve zucchini tortillas

These versatile tortillas pair well with many fillings:
- Tacos: Add grilled chicken, black beans, lettuce, salsa, and avocado.
- Quesadillas: Fill with cheese, sautéed peppers, and onions, then warm in a skillet.
- Breakfast wraps: Add scrambled eggs, spinach, and tomatoes.
- Fresh veggie wraps: Spread with hummus and fill with cucumber, greens, and roasted vegetables.
- Quick snack: Serve with guacamole, salsa, or a yogurt-herb dip.
Storage and reheating
- Refrigerator: Store cooled tortillas in an airtight container for up to 3 days.
- Freezer: Place parchment between each tortilla and freeze in a freezer-safe bag for up to 2 months for best quality.
- Reheating: Warm in a skillet over medium-low heat for about 1 minute per side, or until heated through. Thaw frozen tortillas in the refrigerator before reheating for the best texture.
Frequently asked questions
Can I make zucchini tortillas without almond flour?
Yes. You can experiment with oat flour or all-purpose flour, adding it gradually until the mixture holds together. The texture and flavor will vary.
Why are my zucchini tortillas falling apart?
The zucchini may contain too much water, or the tortillas may be too thin to lift before they set. Squeeze the zucchini well and allow the tortillas to cool briefly before removing them.
Are zucchini tortillas vegan?
This version is vegetarian but not vegan because it contains eggs and cheese. A vegan version requires suitable egg and cheese alternatives, and the texture may differ.
Can I cook these tortillas in a skillet?
Yes, but they are delicate. Use a nonstick skillet over medium-low heat, lightly grease it, and cook small, thin rounds until set on both sides. Flip carefully with a thin spatula.
Printable recipe card
Homemade Zucchini Tortillas
Easy, veggie-packed tortillas for tacos, wraps, and quesadillas.
PREP
15 min
COOK
15–20 min
YIELD
6
Ingredients
- 2 medium zucchini, grated
- 2 large eggs
- ½ cup shredded mozzarella
- ¼ cup almond flour
- ½ teaspoon garlic powder
- ½ teaspoon salt
- ¼ teaspoon black pepper
- 1 tablespoon olive oil, for the pan if needed
Instructions
- Preheat the oven to 400°F (200°C). Line a baking sheet with parchment paper.
- Grate the zucchini and squeeze out as much liquid as possible.
- Mix zucchini, eggs, mozzarella, almond flour, garlic powder, salt, and pepper in a bowl.
- Divide into six portions and spread into thin 5–6-inch circles.
- Bake for 15–20 minutes, until set and lightly golden.
- Rest for 3–5 minutes before carefully lifting and serving.